Three weeks back, my neighbor Sarah grabbed her mare Dusty straight from pasture, threw the tack on in maybe four minutes, hopped up, and figured she'd have a relaxing hour on the trails. Fifteen minutes later? She's back at the barn, off the horse, completely baffled why her normally chill mare bucked five times and wouldn't do more than a trot. I walked over, took one look—saddle perched way too far up on the shoulders, girth so loose I could fit my entire hand underneath—and everything made sense.
So we're going to walk through this properly. Not the glossy Instagram version where riders make it look like magic. The actual process, where you slow down and verify each step.
What You Need Before Saddling Your Horse
Making your third run back to the tack room in twelve minutes? That's when your horse decides standing around tied up is boring. They start pawing. Shifting their weight back and forth. Maybe testing whether that lead rope will snap if they pull hard enough.
Get everything ready before you bring them in from the field.
Grooming supplies: - Rubber curry comb (I save the metal ones for February when my horses look like woolly mammoths) - Stiff brush for the body - Soft finishing brush that won't scratch - Hoof pick—get one with the little brush built in, costs two dollars more and saves you hassle - Towel you don't care about anymore
Saddle components: - Your saddle - The right girth or cinch for it - Stirrups attached to leathers you've checked for cracks in the last month - Billet straps that aren't stiff and crusty
Padding and blankets: - At least one saddle pad - Second shock-absorbing pad if you're going out longer than an hour - Actually clean ones—washed in the last two weeks, not just shaken outside
Pre-saddling checklist: Grab your saddle with both hands, one at the front and one at the back, then push down hard. Flex it side to side. A tree that's cracked will feel wrong—kind of shifts in a way it shouldn't. Check that elastic on your girth by pulling it. Stretched out and limp? You won't get proper tension no matter how many holes you adjust. Inspect those billet straps closely where the holes are punched. Leather fails there first, usually when you're three miles from the barn in any direction.
I keep spare equipment in my trailer. That girth will break at the absolute worst moment if you don't have a backup.
Preparing Your Horse for Tacking Up
Author: Emily Harrington;
Source: 3templatedesign.site
Grooming isn't about Instagram photos. It's how you discover that fresh scratch from the fence or that tender spot that'll turn your quiet horse into a rodeo bronc once you're in the saddle.
Grooming sequence: Curry comb first. Work in big circles across their neck, over the shoulders, along the hindquarters—anywhere with good muscle. Press firmly. You're getting dirt loose, bringing dead hair up to the surface, improving circulation. Switch to your stiff brush next, follow the hair direction. Really focus on where the saddle sits and where the girth goes. One tiny burr hiding under the pad? That's an instant sore forming.
Pick all four feet. Scrape out packed dirt and mud. Hunt for little rocks wedged in the grooves. Thrush has this distinctive death smell and shows up as black nasty stuff in the frog. When a horse has a sore foot, they won't stand balanced, which means your saddle starts out crooked before you even place it.
Checking for sensitivity: Press your hands along their back firmly. Push into the withers area. Trace where the girth will end up. Watch their ears. Pinned flat? They're hurting. Moving away from your hands isn't sass—that's pain avoidance.
Feel for any swelling. Check for warmth. Look for patches where hair seems thin or missing. See white hairs growing in where the coat's normally dark? That's old pressure damage showing you exactly where your saddle's been positioned wrong.
Securing your horse: Cross-ties work perfectly in barn aisles. Or tie to something that won't budge—a post set in concrete, not some fence board that's half-rotted. Use a quick-release knot. Leave about two feet of slack so they can move their head around without panicking.
Work from the shoulder area. Standing directly in front of a horse is asking to catch a hoof to the chest if something startles them.
I examine lame horses almost daily, and back pain from bad saddling? It's the issue in roughly 40% of cases. Your saddle can be half an inch off—just half an inch—and you're creating pressure points that'll have your horse fighting you within a week.
— Dr. Rebecca Thornton
Step-by-Step Instructions for Putting On a Saddle
You've got time. Rushing creates problems.
Positioning the Saddle Pad or Blanket
Grab your pad's front edge and set it down a few inches forward of the final position—I usually go four or five inches past where it'll settle. Slide it backward into place. Never slide forward. That shoves hair the wrong direction, creates rubbing, and you'll end up with raw spots.
Check both sides. Is it even? Walk around back, squat down, eyeball it from that angle. One side hanging lower means uneven pressure and sore muscles developing over the next few rides.
Western riders often layer a blanket under a shaped pad. Blanket goes down first. English riders typically use one contoured pad with the wither relief built in.
Pull that pad up into the channel where it'll run along the spine. You need air space there—it shouldn't flatten onto the vertebrae once you put weight in the saddle.
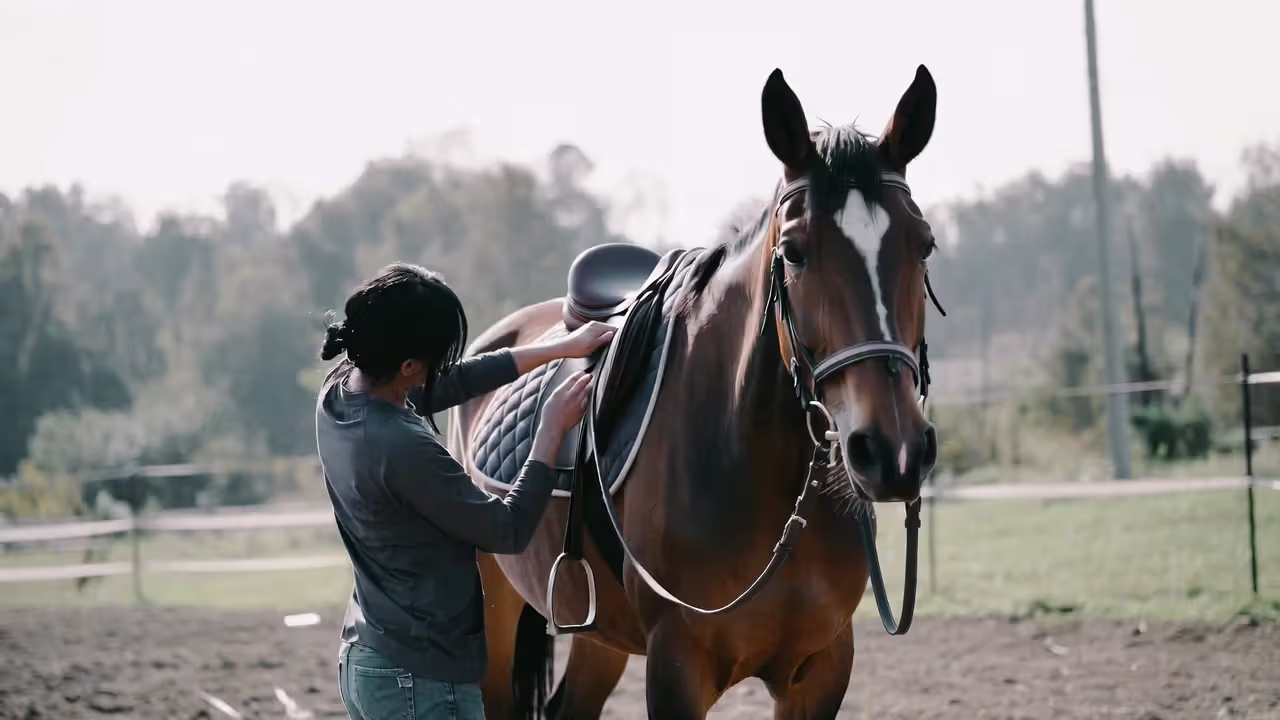
Placing the Saddle Correctly
Come from the left side. Support the saddle with your right arm through the channel, taking the weight. Flip that right stirrup and the girth over the seat so nothing swings around and whacks your horse in the ribs. (Learned that one the hard way when I was twelve.)
Set it down a bit forward of where it belongs, then slide it back. You'll feel it settle naturally—the lowest part of their back, three or four finger-widths behind where the shoulder blade stops.
Once you're mounted later, slip your hand straight up between the front of the saddle and the withers. You need clearance. Not enough room for your whole hand turned sideways, but definitely two or three fingers standing vertical.
Walk around. Check from both sides. A crooked saddle will shift during your ride regardless of how tight you make it.
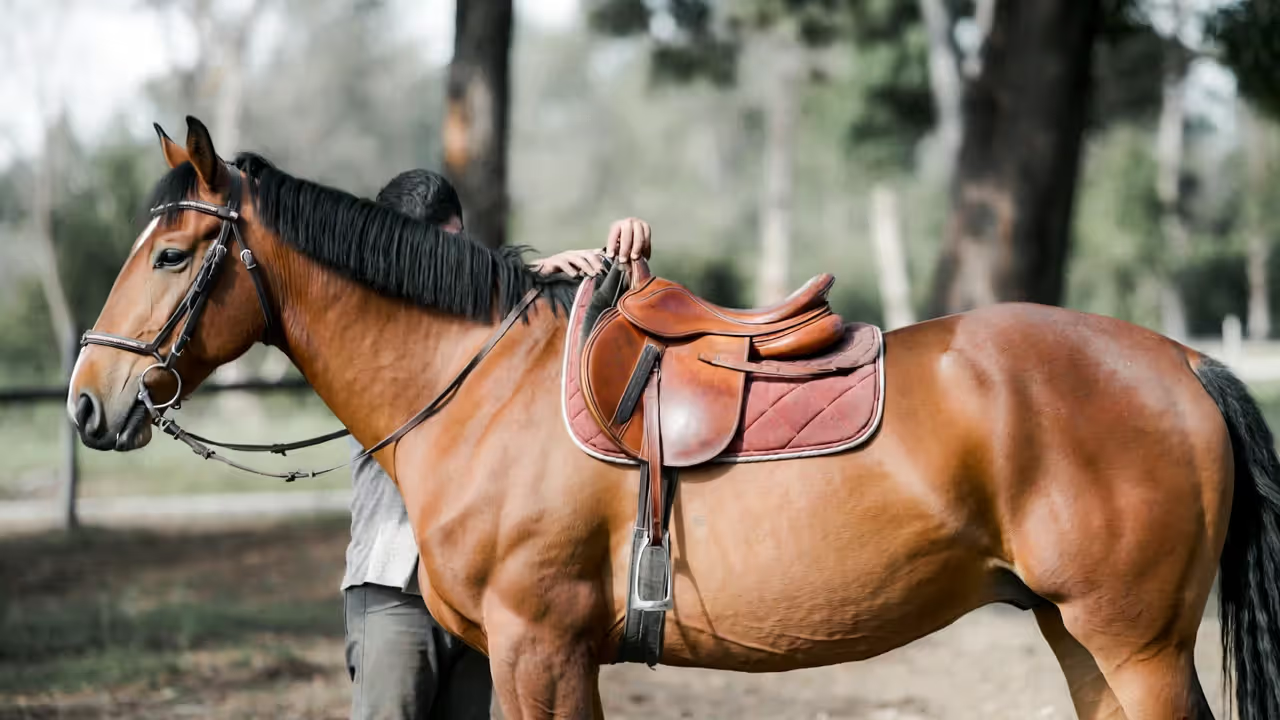
Securing the Girth or Cinch
Reach under their belly, grab your girth. English saddles: fasten to the right side billets first, using the first and third straps. This spreads the pressure out and gives you a backup if one breaks mid-ride.
Don't yank it tight right away. That's how horses learn to hate tack time—they'll hold their breath, pin their ears, some will try to bite you. Snug it until you can slip two fingers between the girth and horse with some resistance but not crushing pressure.
Western cinches use a latigo strap that threads through the cinch ring. The pattern goes up through the ring, down through the saddle's dee ring, back up through the cinch ring again, then you tie it off. This gives you leverage for tightening without fighting it.
Walk your horse forward five or six steps. Tighten one or two more holes. Movement shifts everything into place, lets them exhale if they've been holding air.
Final Adjustments and Safety Checks
Gently pick up each front leg and pull it forward. This smooths out any skin bunched under the girth. Pinched skin becomes an open sore faster than you'd think.
Slide your fingers under the girth at the lowest point. You should feel resistance but still be able to wiggle them around. Too loose means the saddle rolls sideways when you mount. Too tight restricts how they breathe.
Verify the saddle hasn't crept backward. The front points of an English saddle need to clear the shoulder blade's back edge. Watch your horse walk around—the shoulder should move freely without hitting the saddle.
Set stirrups before you get on. English: stand beside your saddle, pull the stirrup to your armpit—the leather should just reach comfortably. Western riders sit deeper; the stirrup bottom should hit around mid-shin when you're standing next to the horse.
Common Saddle Placement Mistakes That Hurt Your Horse
Author: Emily Harrington;
Source: 3templatedesign.site
Placing it too far forward wins the prize for most frequent mistake. Now your saddle tree's sitting right on the shoulder blade, blocking how it rotates with every step. The horse's gait gets choppy and short. They start refusing to canter because it genuinely hurts.
Placing it too far back dumps all your weight on the kidneys and the weaker part of the spine past the ribcage. Horses ridden like this often get cold-backed—they hump up when you first mount, sometimes really buck. The saddle belongs on the ribcage where it's supported. That's it.
Crooked pad placement creates a high spot on one side, low on the other. More pressure on one side means the muscles develop unevenly over weeks and months. Pull your pad off after riding—one side looks completely flattened and soaked while the other barely touched? You found your problem.
Over-tightening the girth seems logical but creates more issues than it solves. Horses learn to expect pain. They start holding their breath when they see you coming with the saddle. Ears pin back. Some try to bite. Some develop actual open sores where the girth rests. Proper tension keeps the saddle from rolling without making them feel like they can't breathe.
Skipping the recheck after you mount gets people dumped. The horse relaxes once they've been moving a few minutes. Everything loosens. If you don't hop off and retighten, you'll end up with a saddle sliding around, especially posting or going uphill.
How to Know If Your Saddle Fits Properly
Saddle fitting boils down to this: your weight needs to distribute across the muscles beside the spine, never directly on the vertebrae, never back on the weak loins.
Signs of poor fit: - White hairs showing up where there weren't any before (pressure killed the cells that make pigment) - Behavior changes when you bring out the tack—ears back, moving away, showing teeth - Strange sweat patterns after your ride (dry spots mean no contact, soaked areas mean too much pressure) - Bucking, rearing, or refusing to go forward - Muscle wasting behind the shoulders—the back starts looking hollow and sunken - Saddle constantly migrating backward or to one side
Basic fitting principles: The channel must clear the spine by at least two fingers when you're sitting up there with your full weight. Rock the saddle gently side to side. Moves too easily? It's too narrow. Won't budge at all? Too wide, probably pinching.
The panels underneath should contact evenly their entire length. Stick your fingers under the panel at different points—pressure should feel consistent everywhere. Bridging happens when the panel only touches front and back with a gap in the middle. All your weight focuses at two points instead of spreading properly.
When to call a professional fitter: Your horse shows discomfort even when you place everything correctly and keep your tack clean? Time to hire a certified saddle fitter. They've got specialized measuring tools for back shape, wither angle, shoulder slope. Horses change shape with fitness level, with seasons, with age. That saddle fitting great in June might pinch in December when they're fuzzy.
Young horses under six are still growing and developing. Recheck fit every six months at minimum. Older horses lose muscle as they age. They might need different padding or shims to make the same saddle work.
Area to Check
Good Fit Indicators
Poor Fit Warning Signs
Withers clearance
Two to three fingers fit standing up when you're mounted; entire spine stays free of pressure
Saddle rests directly on withers; barely one finger fits or the front tips down onto them
Shoulder movement
Shoulder blade rotates back freely at walk and trot; no visible interference
Front points rest on the shoulder blade itself; stride looks restricted, choppy, or shortened
Spine contact
Clear channel visible along the entire spine; you can see daylight through it from behind
Saddle presses on vertebrae anywhere; channel disappears under rider weight
Panel contact
Consistent contact the panel's full length; sweat pattern looks even after riding
Dry patches mixed with extremely soaked areas; obvious bridging with a gap in the center
Balance
Saddle sits level; front and back appear at similar heights
Saddle tips forward pushing rider onto withers or backward sliding rider toward the back
Tack Setup Tips for Different Riding Disciplines
Author: Emily Harrington;
Source: 3templatedesign.site
Western vs. English differences: Western saddles weigh 30 to 60 pounds and distribute that weight over more back area. The cinch attaches at one point and angles forward. You need a thick pad or layered blanket setup to protect the back from all that heavy tree weight.
English saddles weigh 15 to 25 pounds, giving you closer contact with the horse. The girth buckles at two or three points for stability. Standard setup uses one shaped pad with the wither relief; some riders add a gel half-pad under it for extra cushioning during longer sessions.
Trail riding considerations: Long rides demand attention to comfort for both of you. Get a pad that wicks moisture—sweat buildup creates friction issues fast. Every hour, recheck that girth. Horses slim down as they warm up, lose water weight through sweat and breathing.
Pack a crupper for steep terrain. Going downhill, saddles creep forward regardless of what you do unless you've got a crupper or breast collar preventing it. Climbing uphill, a breast collar stops backward migration.
Arena work specifics: Jumping and dressage require precise saddle positioning because balance matters dramatically more. Jumping saddles sit slightly forward with knee rolls for security over fences. Dressage saddles are straighter to allow longer leg position and subtle cues. Neither discipline tolerates sloppy girth tension—the athletic effort shifts a loose saddle immediately.
Barrel racers and ropers need equipment locked down absolutely solid for sudden stops and sharp turns. Most use both a back cinch and breast collar for maximum stability during runs.
Frequently Asked Questions About Saddling Horses
How tight should the girth be?
Snug enough that two fingers slide underneath with some resistance. The saddle should rotate slightly if you really push on it hard from above, but it shouldn't shift when you mount normally. After walking five minutes, step off and go up one or two more holes. Horses relax once moving, everything loosens naturally.
Do I need to re-tighten the girth after mounting?
Absolutely. Walk around for a few minutes first, then dismount and snug it up one or two more holes. Your horse exhales and relaxes once they're moving, which loosens the whole setup. Skip this and you risk the saddle slipping when you start posting or cantering.
Can I use the same saddle for different horses?
Rarely works out well. Every horse has different back shape, wither height, shoulder angle. A saddle fitting one perfectly might pinch or bridge on another. If you regularly ride multiple horses, adjustable pads or shims help somewhat, but they're compromises. Proper fit for each individual horse beats any workaround you'll find.
Proper saddling protects your horse's back, prevents training problems that look like behavior issues, and keeps you safe. Start by grooming thoroughly to find any injuries and clear debris. Position the pad by sliding backward so hair lays flat, then place the saddle at the back's lowest point—never on the shoulder blade, never floating back on the kidneys.
Tighten the girth gradually. Walk your horse several steps to let them relax and adjust, then retighten before you mount. Verify the saddle clears the withers properly, sits level on both sides, and doesn't block shoulder movement. Learn to spot poor fit: white hairs, behavior changes, uneven sweat patterns all signal problems requiring attention.
Different disciplines need specific tack setups, sure, but fundamentals stay constant across all of them. Take the time to do this correctly every single ride. Your horse will move more freely, perform better, and stay sound for years longer than one subjected to careless saddling day after day.
Halter training forms the foundation of every interaction you'll have with your horse. This complete guide covers equipment selection, step-by-step training methods for foals and adult horses, teaching proper leading position, and troubleshooting resistance with practical solutions that build trust and safety.
Training a horse requires patience, consistency, and a clear understanding of equine behavior. This comprehensive guide walks you through practical ground training exercises, compares different training methods, provides a realistic 30-day timeline, and reveals common mistakes that derail progress.
Content on 3templatedesign.site is provided for general informational and educational purposes only. The information on this website may include topics related to horse care, feeding, grooming, horse breeds, training methods, riding techniques, and common horse health conditions.
This content is not intended to be veterinary, medical, training, or professional animal care advice. Horse ownership and riding involve responsibilities and potential risks for both riders and animals.
Users are responsible for evaluating their own experience, equipment, and the condition of their horse before applying any information from this website. Use of this website does not create any professional, veterinary, or advisory relationship with trialstribulations.net.
We are not responsible for any injuries, damages, or losses resulting from the use of information provided on this website. Horse owners and riders are encouraged to consult qualified veterinarians, trainers, or equine professionals when making decisions about horse care or training.